
How to receive GitHub webhooks when using Docker locally
Posted on October 8, 2017 • 7 minute read
I'm working on a series of posts that covers how to build a delivery strategy for PHP using Docker and Jenkins. In order to deploy our application when pull requests are merged, we need to be able to receive webhooks from GitHub.
Normally this wouldn't be an issue, but if you're doing local development with Docker (we are) then, by default, all of our containers run on a private network managed by Docker. Container networking is, of course, configurable. There are three default networks set up when you install Docker: bridge, host and none. The bridge network is the default network containers will use. Because it is a private network, it is not reachable by services like GitHub. This is why you're here!
That said, the host network is worth mentioning. This configuration adds each container to the host's network stack, removing any isolation between the two. This means that if you start a container running Apache on port 80 and the host already has something running on that port, there will be a conflict. If there is no conflict, it means that your host is now a webserver exposed to the internet.
We could configure our application container to use the host network and then GitHub could send webhook payloads to the public IP address of our host machine. This strategy begins to suffer when we start adding more containers to our Docker environment and linking them to our application container.
"Linking" one container to another creates an entry in Docker's embedded DNS server that identifies containers by their name instead of IP address. However, the containers must be in the same network (or in another user-defined network; a topic for another post and certainly more complicated than needed for this task).
Moving forward, we will decide to keep the networking stack simple. We will use the default bridge network. Let's start by writing an "app" that's going to receive our GitHub webhook payloads:
<?php

# By default, GitHub webhook payloads are form-url-encoded
# under the key, "payload". The payload is regular JSON.
$payload = json_decode($_POST['payload'], true);

# Send the contents of "zen" to the error log
# so it shows up in Docker output.
error_log($payload['zen']);
Now, we need a web-server to run it on. We'll use one of the official PHP Docker images that includes Apache. This is also a good opportunity to write a Dockerfile for our application and start a Docker Compose configuration.
<VirtualHost *:80>
    DocumentRoot /srv/web

    <Directory "/srv/web">
        AllowOverride all
        Require all granted
    </Directory>

    ErrorLog ${APACHE_LOG_DIR}/error.log
    CustomLog ${APACHE_LOG_DIR}/access.log combined
</VirtualHost>
This is a very simple Apache virtual host config that we're going to copy in as part of the image build process.
FROM php:7.1-apache

COPY index.php /srv/web
COPY web.conf /etc/apache2/sites-available/000-default.conf

RUN chown -R www-data:www-data /srv/web
Our Dockerfile extends the php:7.1-apache Docker image with a few modifications. Then it copies index.php (our amazing application) to the web root that we've configured. Next, it copies our virtual host config over the default that ships with the image we're extending. Finally, it grants Apache access to the space we've created.
version: '3'
services:
  web:
    build: .
    ports:
      - "80:80"
Configure a single service, web, that builds an image from our Dockerfile. It forwards port 80 on the host to the same port on the web container.
Fire it up!
Run docker-compose up --build and we should get the following output:
$ docker-compose up --build
Building web
Step 1/4 : FROM php:7.1-apache
 ---> 732d9549c027
Step 2/4 : COPY index.php /srv/web/
 ---> b9f579d06e52
Step 3/4 : COPY web.conf /etc/apache2/sites-available/000-default.conf
 ---> 302d1f49c66a
Step 4/4 : RUN chown -R www-data:www-data /srv/web
 ---> b4893b4c5df4
Successfully built b4893b4c5df4
Successfully tagged docker_web:latest
Creating docker_web_1 ...
Creating docker_web_1 ... done
Attaching to docker_web_1
If you're running on Windows or OS X, run docker-machine ip to figure out the IP of the VM Docker is running on. On Linux, you should be able to use localhost, assuming you're using your machine as the Docker host. In my case, my "docker machine's" IP is 192.168.99.100. Visit that IP on a web-browser and watch the output of your Docker terminal:
web_1  | 192.168.99.1 - - [25/Sep/2017:04:56:29 +0000] "GET / HTTP/1.1" 200 227 "-" "Mozilla/5.0 (Windows NT 10.0; Win64; x64) AppleWebKit/537.36 (KHTML, like Gecko) Chrome/60.0.3112.113 Safari/537.36"
web_1  | [Mon Sep 25 04:56:30.667111 2017] [php7:notice] [pid 19] [client 192.168.99.1:56559]
The first line is the Apache access long entry showing a GET request to index.php. The second is the call to error_log from our app. When actual data is sent there, we'll see it. I'll crack open Postman and send a request:
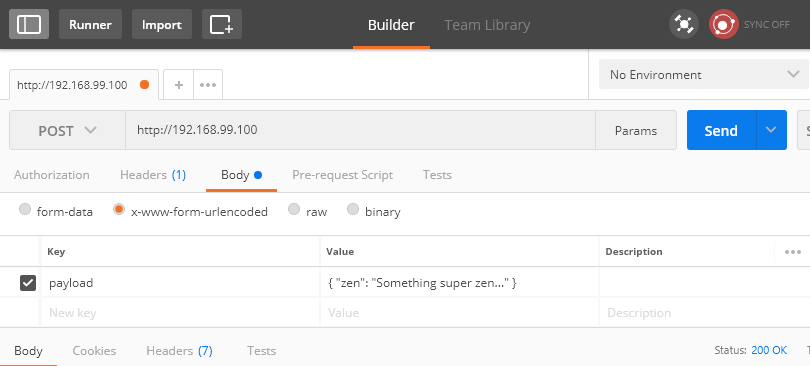
We send a POST request to http://192.168.99.100 similar to what GitHub will send, albeit much, much smaller.
web_1  | 192.168.99.1 - - [25/Sep/2017:04:59:11 +0000] "POST / HTTP/1.1" 200 228 "-" "Mozilla/5.0 (Windows NT 10.0; Win64; x64) AppleWebKit/537.36 (KHTML, like Gecko) Chrome/60.0.3112.113 Safari/537.36"
web_1  | [Mon Sep 25 05:02:23.944625 2017] [php7:notice] [pid 21] [client 192.168.99.1:56762] Something super zen...
We see our POST request and there's a message in the error log! Awesome!
Now let's test a GitHub integration with our application. We need a public address to point the webhook at, but our container is running in a private network. This is where localtunnel comes in. Localtunnel is a Node.js package that allows you to share a service running on your local development machine with the internet. It assigns a unique publicly accessible URL that will proxy all requests to our machine. We will pull this in as a separate service in our Docker environment:
FROM node:6

RUN npm install -g localtunnel

ENTRYPOINT ["lt"]
This Dockerfile will build the image for our localtunnel (lt) service. It extends the official Node.js 6 image by installing localtunnel and then executing it when the container is started.
version: '3'
services:
  web:
    build: .
    ports:
      - "80:80"
  localtunnel:
    build:
      context: .
      dockerfile: Dockerfile-lt
    links:
      - web
    command:
      --local-host web --port 80 --subdomain mdwheele
We add a new service called localtunnel. We have to specify build as an object because we want to use an alternate name for the Dockerfile. The service links to web. This will create an entry in Docker's embedded DNS which will allow localtunnel to reference web by its name. We do this so that when lt runs, we have a hostname to proxy requests to. The last bit uses command to add options to lt. By default, lt listens on localhost. Use the --local-host option to change that to web. lt registers a random sub-domain on https://localtunnel.me which would look something like https://gqgh.localtunnel.me. This will change every time the container is run. Since we're going to use this in our GitHub webhook configuration, we use the --subdomain option to specify something static.
Run docker-compose up --build:
Starting dockerlocaltunnelme_web_1 ...
Starting dockerlocaltunnelme_web_1 ... done
Creating dockerlocaltunnelme_localtunnel_1 ...
Creating dockerlocaltunnelme_localtunnel_1 ... done
Attaching to dockerlocaltunnelme_web_1, dockerlocaltunnelme_localtunnel_1
Now we're ready to add our webhook. Create a GitHub webhook that points to whatever subdomain you configured. In my case, it's https://mdwheele.localtunnel.me. You can configure the webhook to use application/json instead of x-www-form-urlencoded (the default). I chose to leave the default.
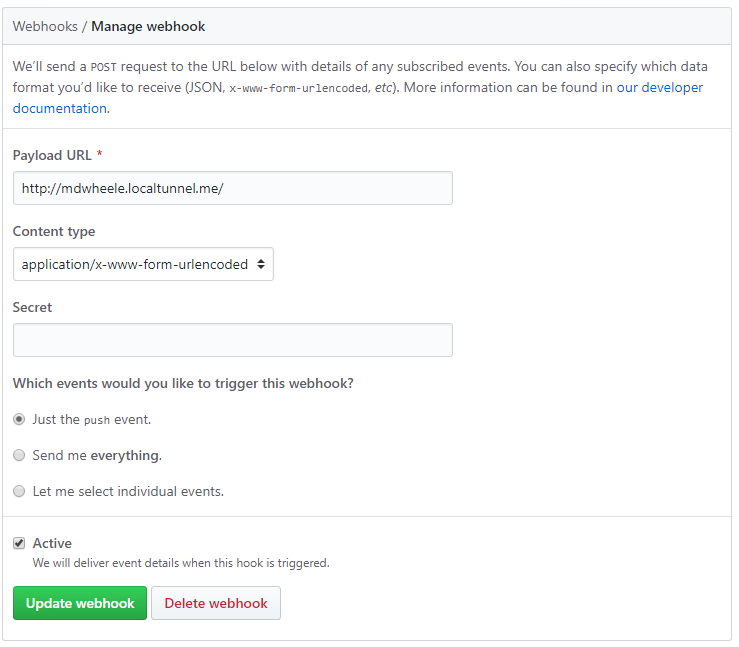
When you save, GitHub sends a test payload. You should see that show up in the logs. If it shows up, then everything is working! With this completed, we can now receive push events from GitHub.
web_1          | 172.20.0.3 - - [25/Sep/2017:05:21:13 +0000] "POST / HTTP/1.1" 200 191 "-" "GitHub-Hookshot/f767822"
web_1          | [Mon Sep 25 05:21:23.236209 2017] [php7:notice] [pid 19] [client 172.20.0.3:47346] Practicality beats purity.
Word of warning
localtunnel.me is an open-source third-party service provided by some person on the internet. Place that wherever you feel necessary on your "trust shelf". Technically, we're proxying our data through them and technically, they could be harvesting it. I personally trust the service, but it's worth mentioning. I would never use this strategy for anything that had personally identifying information or anything more sensitive than my toothbrush. Thankfully, the tech IS open-source and you could always host your own.
Welcome to my blog!
I will be posting a lot of content over the next few months across a wide variety of topics including material like you've just read. I am an aspiring writer, so if you can get past my terrible grammar, I think I have a lot of valuable ideas to share with you. If you're interested, I would really like to reach out when I publish a new article! No spam, I swear.